Maintenance-induced problems are common, and it often an experienced pair of eyes to diagnose them.
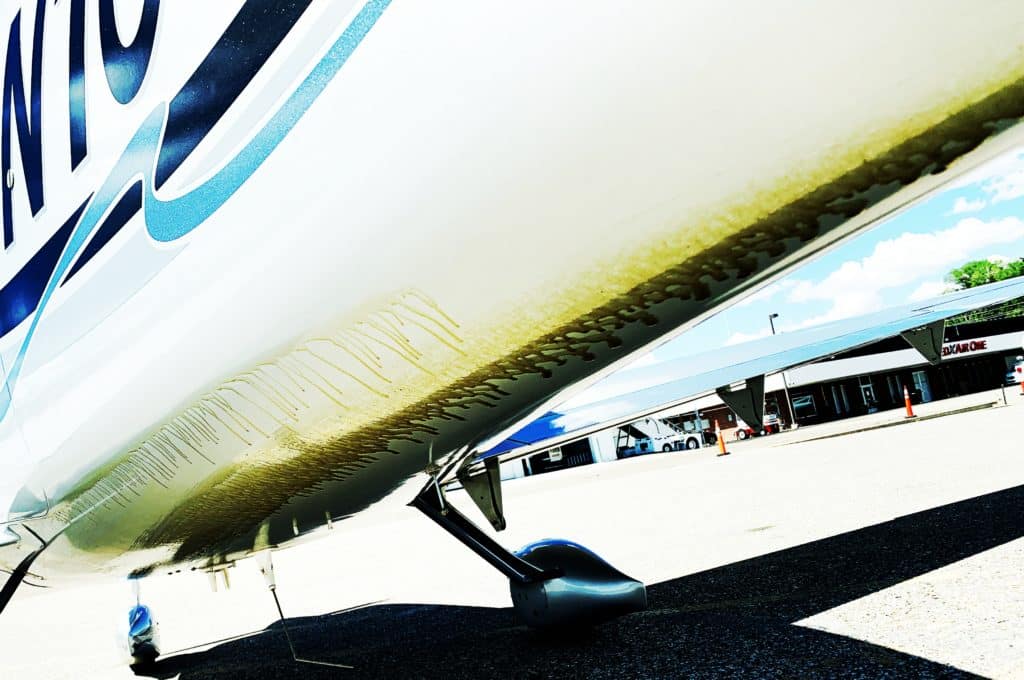
Elko Regional Airport (KEKO) is located in northeast Nevada at an elevation of 5,000 feet above sea level, and is known for its competitive avgas prices. It’s pretty much in the middle of nowhere…but if you happen to be flying from the Pacific Northwest to Arizona, KEKO is a convenient midway fuel stop.
That’s exactly what Jack was doing one fine Thursday afternoon in his Cirrus SR22 Turbo. The airplane had been performing flawlessly, so after landing at Elko Jack was floored to find engine oil dripping out of the left exhaust stack and streaked along the left underside of the fuselage. This is not the sort of thing that you want to see when you’re in the middle of nowhere.
Jack checked with the FBO but their A&P had gone home for the day. He phoned Savvy Aviation’s 24/7 hotline number and quickly got a callback from Tony Barrell A&P/IA, one of Savvy’s most experienced account managers and former director of maintenance at a large Cirrus Service Center.
Remote Diagnosis
Jack sent Tony several smartphone photos of his oil-covered airplane. “No mechanic is available until tomorrow,” Jack told Tony. “Is there any value in me removing the top cowl to look for something simple?” Tony encouraged Jack to do that and take photos of what he found. As their conversation continued, Tony learned from Jack that the airplane had recently come out of an annual inspection during which all of its oil hoses had been replaced after 10 years in service. Tony suggested that Jack look closely at the oil lines to see if any of them appeared to be chafed or have loose connections.
Jack removed the top cowling and sent Tony a half-dozen photos of what he found. There was oil all over the place on the left side of the engine, but all the oil hoses appeared to be secure and intact. One photo caught Tony’s experienced eye, however. Tony passed the photo to another of his Savvy colleagues, Al Hawthorne A&P/IA, who works closely with a big Cirrus Service Center near Sacramento, California.
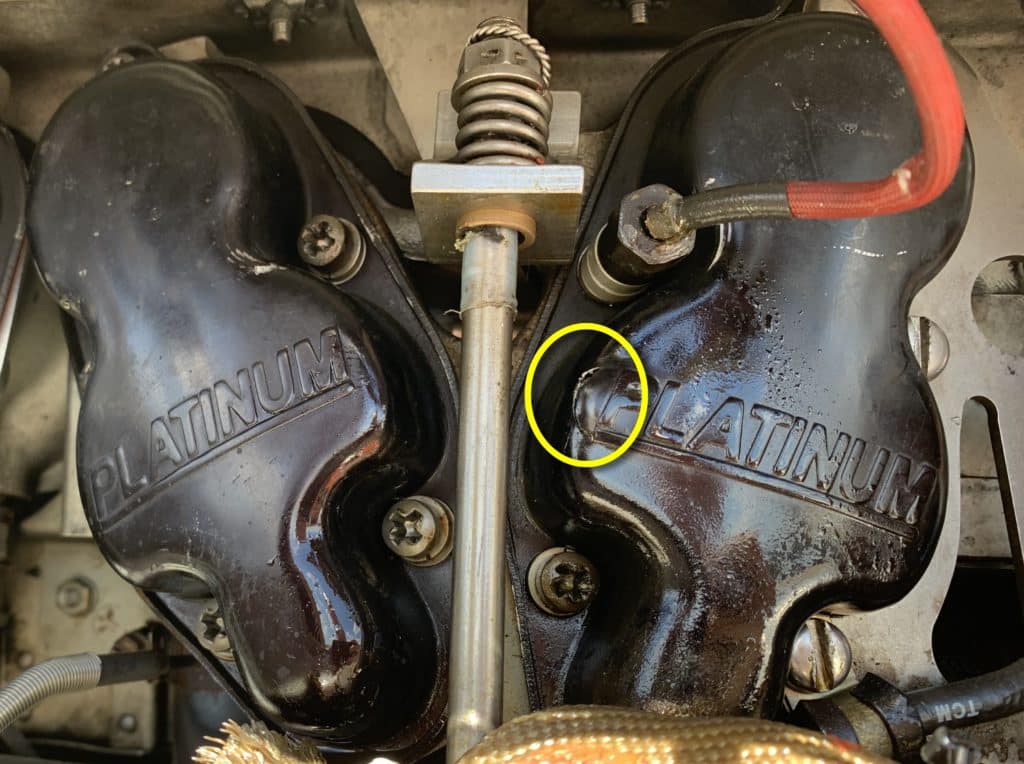
“Check out the valve cover picture that Jack’s sent,” Tony told Al. “Looks to me like the cover is cracked and bulged out. Possibly the bolts securing the rocker shaft came loose. Hope not, but it looks possible. Shop on the field can’t look at this until tomorrow. Can you get a new valve cover overnighted to Elko?”
Al checked with the Sacramento service center and located a valve cover. It was too late to ship the part out that day, so Al arranged for it to be overnighted on Friday, together with a new gasket and locktabs.
Surveying the Damage
Meantime, Jack had removed the damaged valve cover and verified that both bolts securing the rocker shaft had backed off despite the safety locktabs. The rocker shaft was loose and the rocker assembly had been banging against the loose bolt heads, causing them to gouge the inside of the valve cover to the point of cracking it and causing it to leak oil.
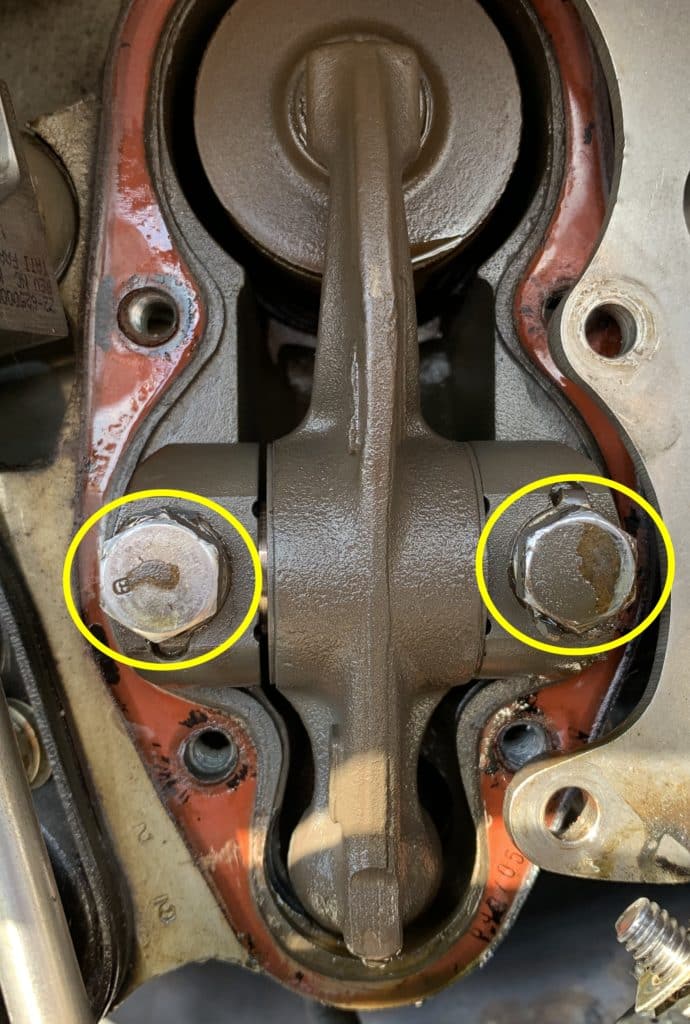
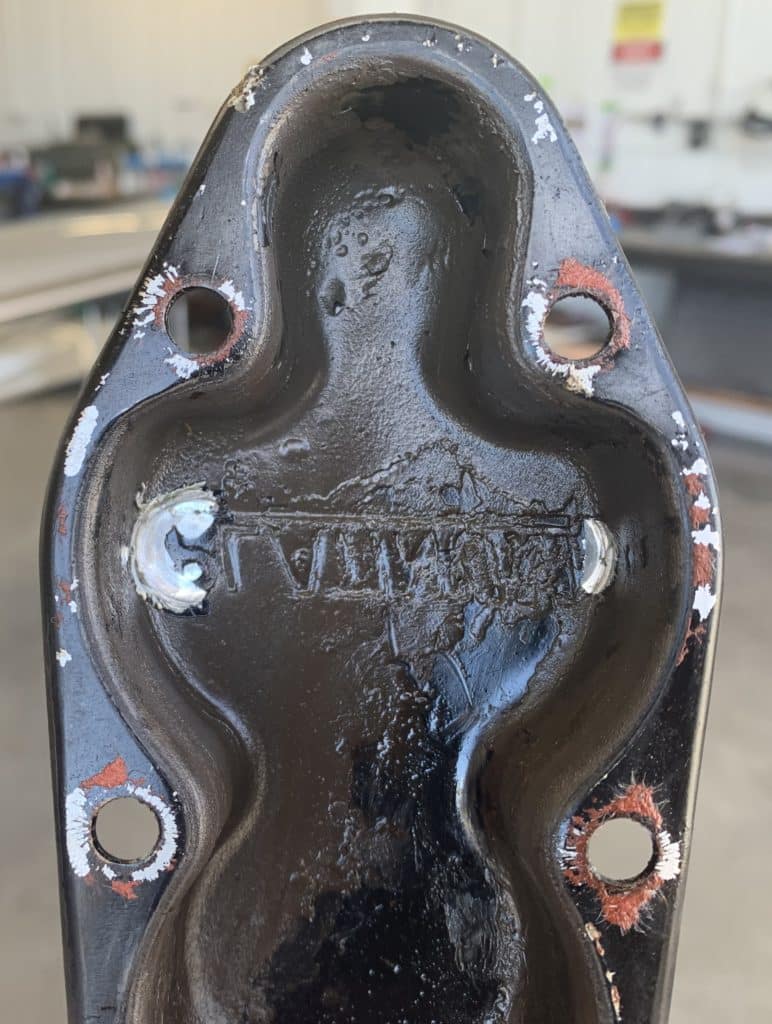
Seeing how much metal had been gouged from the inside of the valve cover, Jack became concerned that his engine might be contaminated with metal. Tony assured him that there was nothing to worry about because any metal that managed to get out of the valve cover area would have been caught by the suction screen or the oil filter. Jack was relieved.
There’s no Saturday delivery to Elko, so the new valve cover, gasket and locktabs arrived on Monday morning. Meantime, the local A&P at Elko had removed the loose rocker bolts and found that they were badly stripped and stretched and unusable. So new bolts had to be overnighted in.
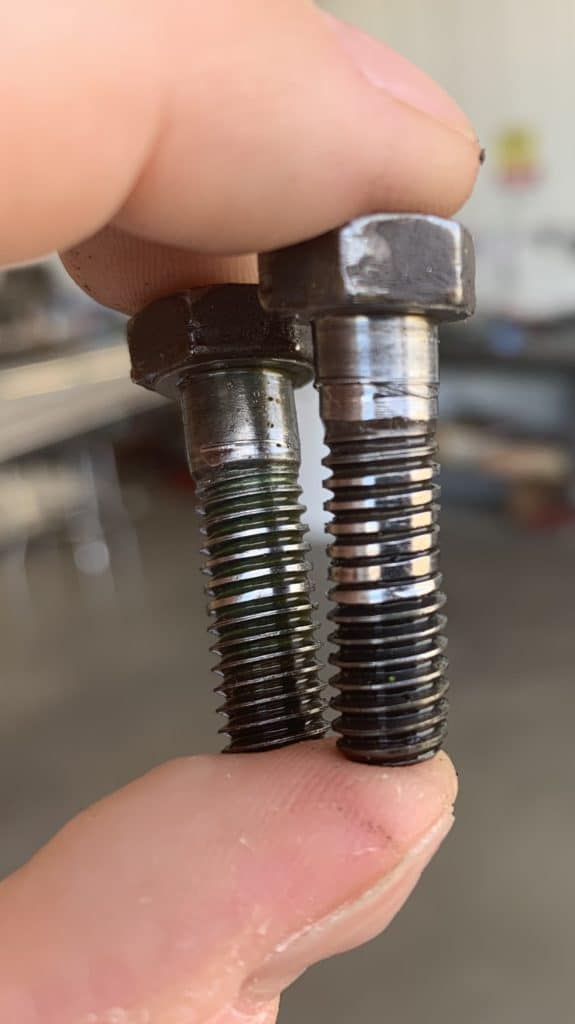
The new bolts arrived Tuesday morning, and the local A&P installed, torqued and safetied them, then installed the new valve cover and gasket. The engine compartment and oil-covered fuselage were washed with solvent, and the engine cowling was reinstalled. An extended runup and brief test flight revealed no further oil leaks. Jack was finally able to resume his trip after what turned into a six-day fuel stop in the middle of nowhere.
“We’re back home and she flew great,” Jack reported to Tony and Al. “We’re going to do an oil and filter change tomorrow.”
How’d This Happen?
This was a close call. Had Jack not caught this problem when he did, it wouldn’t have taken long before the valve cover failed to the point of causing engine oil starvation, valve train failure, or both. The fortuitous timing of Jack’s fuel stop in Elko combined with Tony’s experienced eyes saved the day.
That leaves the obvious question: How’d this happen? There’s really only one thing that could have caused it to happen, and that is failure to torque the rocker retention bolts properly before setting the locktabs. These bolts are subject to high repetitive stress, so the integrity of the joint depends pivotally on proper torque (and preload) on the fasteners. If the bolts weren’t installed with the requisite torque, there’s no way the locktabs could survive for very long.
Failure to torque these bolts properly is not the sort of thing that could easily happen at the factory (where fasteners are installed using purpose-made non-adjustable torque wrenches). Nor would it be likely to happen at an FAA-certified engine repair station (where the technicians are experts at engine assembly). It very likely occurred during cylinder work in the field, where reassembly errors are disturbingly common in my experience.
A Case of Elusive High CHT
Wade’s Cirrus SR22 was based in Wisconsin where it’s frigid in the winter and hot in the summer. The plane performed fine in the winter, but in the summer Wade couldn’t keep the #3 CHT under 400°F no matter how hard he tried. The other five cylinders of his turbonormalized Continental IO-550-N seemed well behaved, but cylinder #3 was simply hot-headed.
Wade had been battling this problem for two years. He’d asked his shop in Wisconsin to fix it. He’d taken it to a Cirrus Service Center in Minnesota. He’d even taken it to the developer of the Cirrus turbonormalizing STC— Tornado Alley Turbo in Oklahoma—for an annual inspection. Nobody was able to cure the problem.
It wasn’t for lack of trying. These shops had checked the cooling baffles and baffle seals, checked the magneto timing, borescoped the cylinders, replaced the spark plugs, cleaned tweaked the fuel nozzles, and swapped CHT probes. Nothing seemed to help.
Conflicting Advice
Wade contacted Continental Motors, where the tech rep said they never worry about CHT unless it exceeds 420°F, and pointed out that Continental’s CHT redline is 460°F. Wade remained unconvinced, and believed his #3 cylinder was unlikely to live long and prosper at such high CHT.
Wade brought his problem to me and I got my technical director Jeff Iskierka involved. We reviewed the aircraft’s digital engine monitor data and studied its maintenance history to see what had been tried and what might have been missed. Meantime, the various shops that had been working on Wade’s SR22TN were telling him that the only thing left to try was to replace the hot-running #3 cylinder. Wade was willing to try this, but Jeff and I suggested that he hold off.
For one thing, cylinder replacement is sufficiently invasive that we recommend not doing it unless absolutely necessary. Wade’s #3 cylinder had good compression and looked just fine under the borescope. Removing it under these circumstances seemed like a desperation move.
For another, Jeff and I agreed that Wade’s high CHT problem simply did not “feel” like a cylinder defect. Both of us were convinced it was most likely caused by insufficient cooling air passing over the cylinder’s cooling fins, even though several different shops had looked at the cooling baffles and baffle seals and pronounced them healthy.
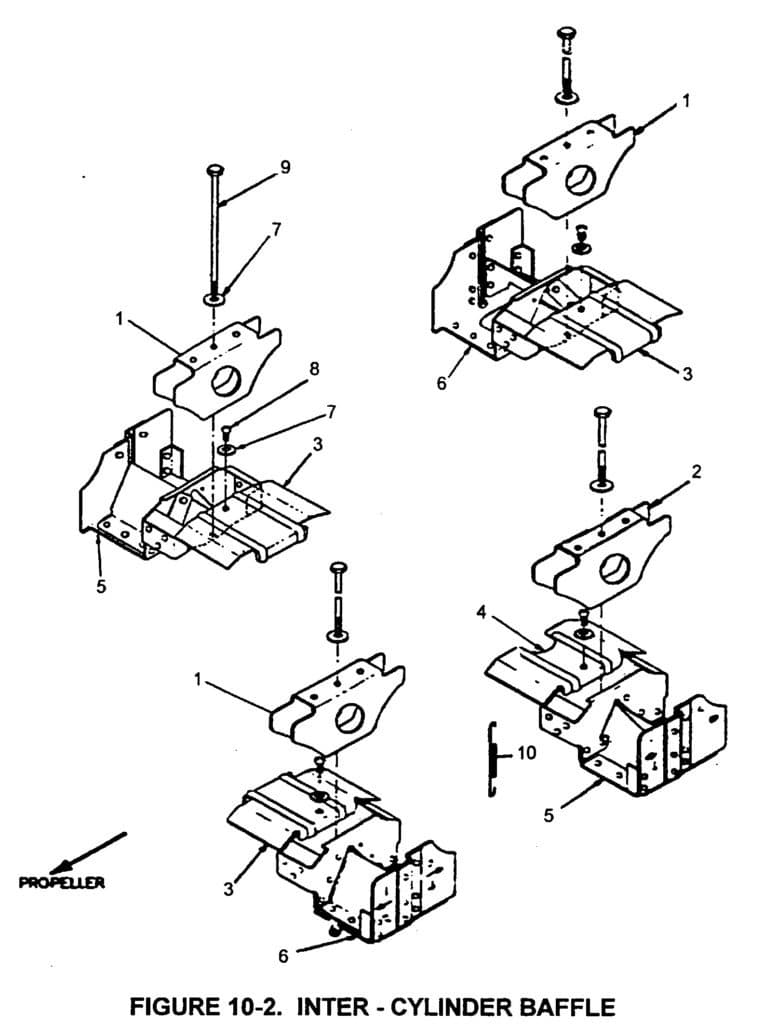
Given that only one cylinder was running hot, Jeff and I suspected a possible problem with the engine’s inter-cylinder baffles. These are small, odd-shaped pieces of aluminum that sit beneath and between adjacent pairs of cylinders and prevent cooling air from flowing through the gap between the cylinders and bypassing the cooling fins.
The Right Set of Eyes
In the meantime, Wade had relocated from Wisconsin to Wyoming, where Cirrus-qualified maintenance shops are few and far between. So, when Wade reported having an issue with his Avidyne DFC-100 autopilot, Jeff recommended that he take the airplane to Arapahoe Aero at Centennial Airport (KAPA) just south of Denver. Arapahoe is a Cirrus Authorized Service Center with a good avionics shop, and Savvy’s prior experience with Arapahoe had been excellent.
Jeff contacted Arapahoe’s Director of Maintenance, John Wells and asked that he put Wade’s airplane on the avionics shop schedule for autopilot work. Jeff also told John that the airplane had been having a persistent problem with elevated #3 CHT and asked if John would inspect the engine to see if he could find anything that might be responsible for this, with special emphasis on the inter-cylinder baffles. John said he’d be happy to have a look.
Wade flew the plane to Centennial. The avionics shop worked on the autopilot while John and one of his most senior technicians inspected the plane’s engine. A few days later, John sent Jeff the following message:
We have been looking at the engine and I think we may have found the culprit. The inter-cylinder baffles on the right side of the engine are installed incorrectly. They are location-specific on the IO-550-N, and the baffles appear to be swapped front to back. This may seem like a minor thing, but we have seen it make a significant difference in the past. I would recommend swapping the baffles into their correct position and performing a test flight.
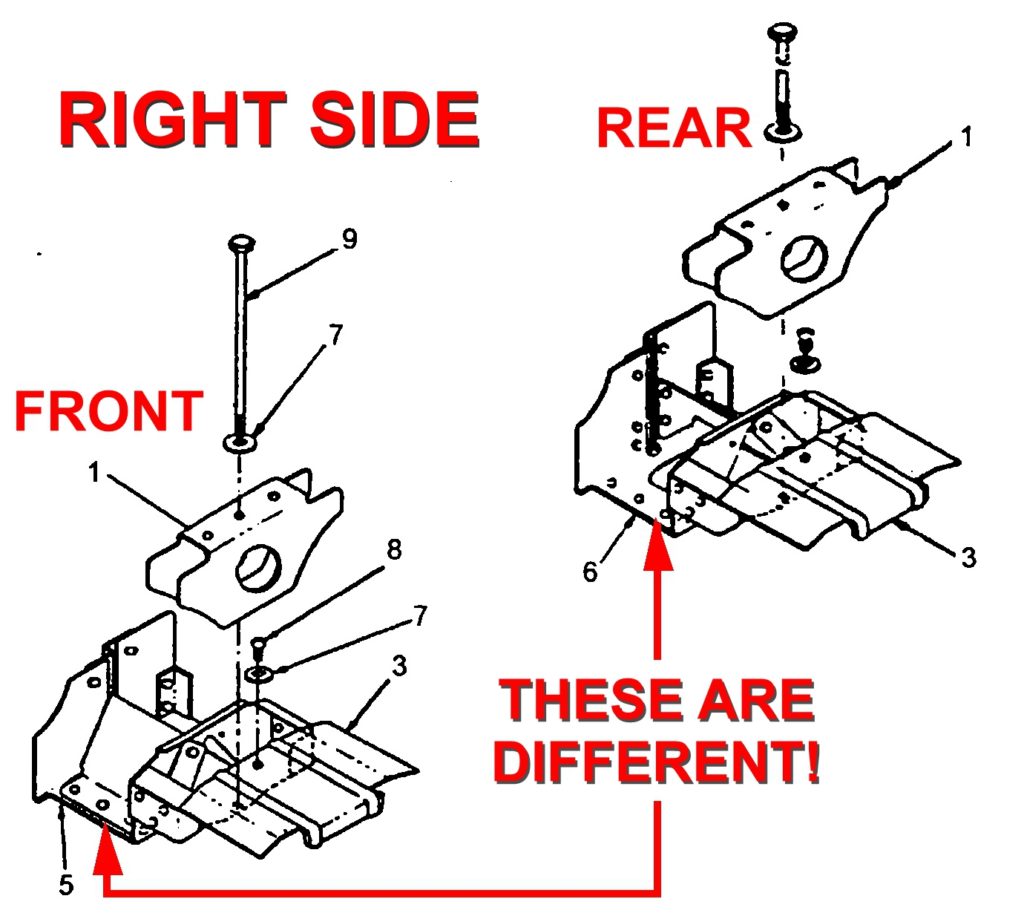
Bingo! Once the right hand front and rear inter-cylinder baffles were moved to their proper locations, the test flight showed that the #3 CHT had returned to normal, and Wade’s two-year quest for a solution was finally over. Once again, this mistake didn’t happen at the Continental factory, it happened during cylinder work in the field. A perceptive diagnosis and a sharp set of eyes resolved another elusive maintenance-induced issue.
You bought a plane to fly it, not stress over maintenance.
At Savvy Aviation, we believe you shouldn’t have to navigate the complexities of aircraft maintenance alone. And you definitely shouldn’t be surprised when your shop’s invoice arrives.
Savvy Aviation isn’t a maintenance shop – we empower you with the knowledge and expert consultation you need to be in control of your own maintenance events – so your shop takes directives (not gives them). Whatever your maintenance needs, Savvy has a perfect plan for you: