As we enter our 5th year of Savvy Analysis Pro, we have – as the guy on TV says – seen a thing or two in terms of the Savvy Test Profile. We decided it was time for an update, and I thought this month’s Puzzler would be an ideal time and place to review the changes. What didn’t change is the test is still a series of mixture sweeps and a lean-of-peak mag check. Let’s take them one at a time.
Mixture Sweeps – aka GAMI sweeps
The GAMI lean test is designed to measure mixture distribution, and is used to help diagnose incorrect fuel nozzle sizing, and dirty or clogged fuel nozzles. We compare the difference in fuel flow between where the leanest-running cylinder reaches peak EGT and where the richest-running cylinder reaches peak EGT. That difference (measured in gallons-per-hour) is called the “GAMI spread.” In our experience, the GAMI spread must be under 1 GPH for the engine to operate smoothly when lean-of-peak (LOP). For fuel-injected engines, the goal should be to reduce the GAMI spread to 0.5 GPH or less for optimum LOP operation.
Begin the GAMI lean test procedure by setting up the airplane in normal cruise – use your autopilot if you have one.
Cruise power setting for this test should be 65% or less at wide open throttle (WOT) to avoid excessive CHTs and stress on the cylinder assemblies.
For normally aspirated engines: Climb to an altitude that allows 65% power or less at WOT.
For turbo engines: After picking a MAP and RPM that represents 65% power or less, climb to the altitude where ambient air pressure is very nearly equal to your chosen MAP. (Assume ambient sea level pressure of ~29.92 drops 1” with every 1000 MSL of altitude.)
Start with a rich mixture of at least 100°F ROP.
Retard the mixture control as slowly and steadily as you possibly can until the onset of roughness. Try to do this slowly enough that it takes no less than 3-4 minutes to move from the rich mixture to the lean one. The slower and smoother you can move the mixture control, the better. Note the fuel flow in GPH or PPH. For turbos that do not have automatic waste gate, do your best to maintain your target MAP as you lean the mixture by adjusting MAP as necessary as you change mixture.
There’s no value added by leaning past the onset of roughness to the point of engine stumble or flame-out.
Reverse the process, richening very slowly until you get back to about 100°F ROP. Then reverse again and lean to your previously noted GPH or PPH lean point. Again, try to do this slowly enough that it takes 3-4 minutes to do the sweep while maintaining your target MAP.
Repeat this rich-to-lean-to-rich mixture sweep procedure; preferably 3 times. (This allows us to obtain an average of several sweeps, which provides more accurate information than one sweep alone and allows us to discard sweeps with poor data e.g., moving too quickly through peak.)
In fact, the most common error (or as Bill Kershner would say, “rookie mistake”) is leaning too fast through the peak and then trying to make up for it by leaning very slowly as you approach the lean side. A steady rate of change gives the best results.
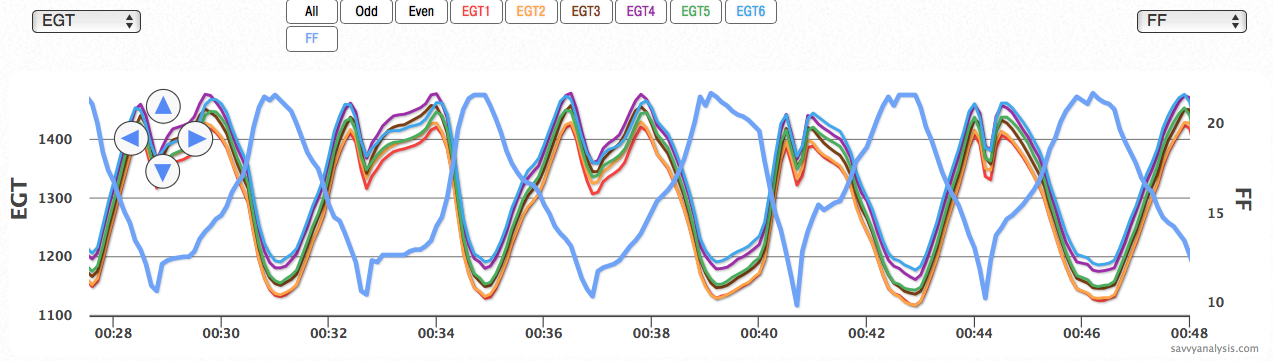
This set of sweeps shows the connection between a smooth rate of change and a well-defined EGT peak. The bold blue line is fuel flow.
Rich-to-lean rate of change is excellent. Lean-to-rich rate of change is not as consistent – but still usable.
On your last rich-to-lean sweep, and while still on the lean side, do not simply go back to a cruise ROP or LOP cruise setting but instead transition to the LOP Mag test before changing anything. (The reason for this is we want to be able to tell precisely how LOP the engine is when the LOP Mag test is done.)
In-Flight Lean-of-Peak Mag Check
The in-flight lean mag check is a test of ignition system performance, and is used to help diagnose problems with spark plugs, magnetos, mag timing and ignition harnesses. A lean mixture will reveal a weak plug that might be masked with a richer mixture. Our goal is to select a mixture that will identify weak spark – without inciting it.
Perform the in-flight lean mag check procedure by setting up the airplane in normal cruise – use your autopilot if you have one. Then perform the following procedure.
Perform at least one GAMI Lean sweep as described above from ROP to LOP – OR – at the last of your multiple GAMI Lean sweeps from ROP to LOP above, continue to lean to 50º LOP if you are able, or to the onset of roughness. If you leaned to the point of first roughness, slowly richen just enough to get back to a smooth running engine. (50º LOP is about the maximum LOP you should ever need to run and we see no value in suggesting maintenance to run leaner than necessary.)
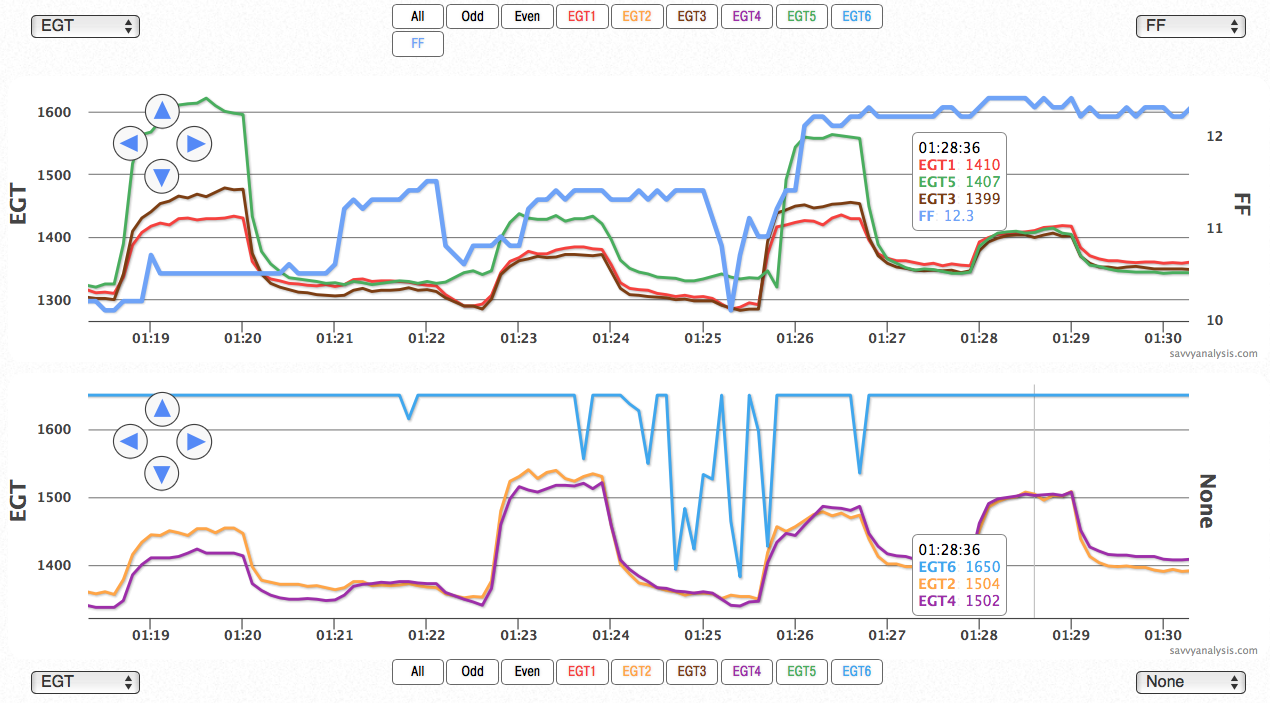
When analysts open a chart, we can spot the LOP mag check using the “humps” in EGT. The first thing to jump out on this chart was EGT 6 – the blue trace on the bottom graph, high and mostly flatlined. In most cases, a loose connection will depict erratic EGT or a flatline of zero degrees. EGT 6 looks more like a failed probe.
Overlaying fuel flow – the bold bue trace on the top graph – shows that FF was about 10.5 on the first mag checked, rose to about 11.7 on the second mag, then is steady at about 12 GPH for the last two humps. We would draw conclusions from the last set where FF doesn’t change.
On this engine, each mag fires a top plug and a bottom plug, so we’re looking for a rise from the top plugs to the bottom plugs. Since we see that, mags appear to be closely timed.
The bottom plug of cyl 5 – the green trace – is higher than expected, so we’d recommend checking the plug and harness.
For a key or rotary style magneto switch (as found in most singles), select BOTH-LEFT-BOTH-RIGHT-BOTH, leaving the mag switch in each of these positions for at least 10 engine monitor sample times or at least 30 seconds; including in the BOTH position. (If your sample interval is 6 seconds, that will be a full minute; if your sample interval is 1 second, then use the minimum of 30 seconds.)
For individual magneto toggle switches (as found in most twins), turn off the L engine RIGHT MAGNETO (so that only the left magneto will be firing) switch for at least 10 engine monitor sample times or a minimum of 30 seconds, then turn it back on so that both are firing and wait for at least 10 engine monitor sample times or a minimum of 30 seconds. (If your sample interval is 6 seconds, that will be a full minute; if your sample interval is 1 second, then use the minimum of 30 seconds.) Repeat this procedure by turning off the L engine LEFT MAGNETO (so that only the right magneto is firing.) Then perform the same test on the R engine.
NOTE: It is normal for engines to run a bit rougher on one magneto than they do on two, but they should not run “change-of-underwear” rough. Please report on the level of perceived roughness during phase of the test. (e.g. smooth, moderate, severe)
NOTE: For turbocharged engines, TIT may rise to or above red-line during single-magneto operation. This is normal and will not be harmful for the short duration of the flight test.
NOTE: RAM engines or Experimental engines with uneven or split timed magneto timing and unconventional spark plug wiring. Please tell us if your engine is a RAM engine or has uneven mag timing and the pertinent details. (For example RAM VII engines time the L mag @ 23º BTDC and R at @ 21º BTDC and the left mag fires all the top plugs.)
NOTE: For engines with Electronic Ignition. For those with both a conventional mag and an electronic mag, please use the same order of LEFT-BOTH-RIGHT but be sure to tell us which magneto is the conventional one and which is the electronic one and what type of electronic mag is being used. Additionally, if the wiring harness is unconventional, i.e. electronic mag firing all top plugs, please inform us of the details.
A Word About Induction
Earlier versions of the Test Profile had instructions for an induction test. Our current thinking is that induction leaks are rare enough that we’ll ask for and give instructions for an induction test only if the data gives us reason to suspect a leak.
Options for the Cockpit
Now that you’re armed with the details of the Savvy Test Profile, here are the options for taking the information into the cockpit with you.
Click here for a printable kneepad-sized crib sheet to refer to in flight.
You can import documents into ForeFlight. Click here to find out how. If you already know how, click here for a digital crib sheet that you can import into ForeFlight.
We don’t advise printing and reading this entire document while flying solo. If you have an assistant that can read it to you, click here for a printable pdf of the test profile.
