Destructive detonation and pre-ignition events can destroy your engine in two minutes flat. Know the symptoms, and act fast!
At least once a year, I am contacted by an aircraft owner whose piston aircraft engine was destroyed or severely damaged by a destructive detonation or pre-ignition event. But lately, the pace seems to be quickening. In a recent 12-month period, I’ve encountered three of them.
One recent incident involved Cirrus SR-20 powered by a 200 horsepower TCM IO-360-ES engine. The plane was equipped with a snazzy Avidyne Entegra MFD with an integrated engine monitoring system called “EMAX.”
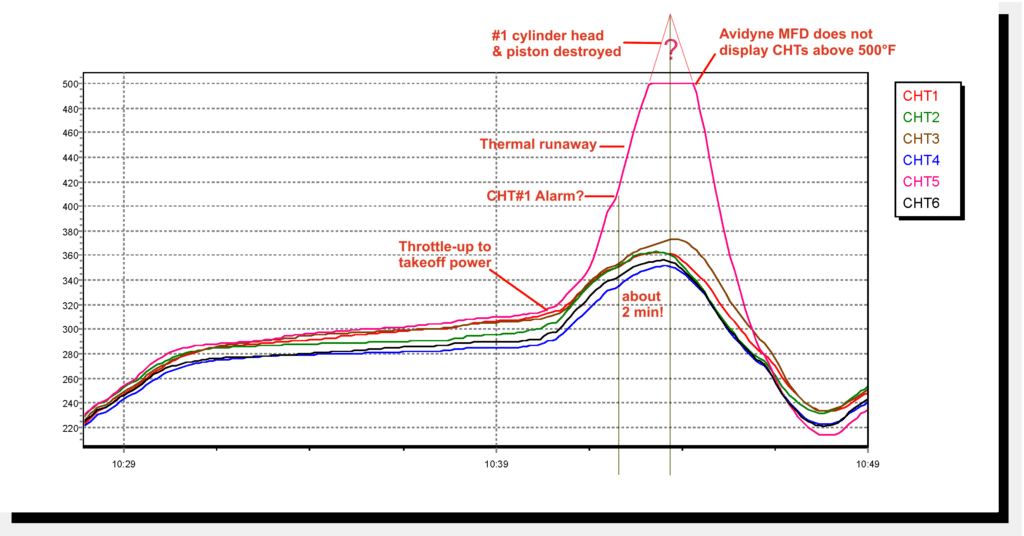
The CHT data downloaded from the EMAX system tells the short tale of this engine’s demise:

Everything looked fine until about two minutes after the pilot applied takeoff power, at which point the #1 cylinder’s CHT began to climb rapidly compared to the other five cylinders. At the three-minute mark after brake release—with the aircraft at roughly 2,000’ AGL—CHT #1 rose above 400°F and set off a high-CHT alarm on the MFD.
CHT #1 continued its rapid rise—nearly 1°F per second—that continued unabated until the piston and cylinder head were destroyed approximately five minutes after takeoff power was applied and two minutes after the CHT alarm was displayed. At that point, since the cylinder was no longer capable of combustion, CHT #1 started plummeting.
We can’t be sure just how hot CHT #1 got because the Avidyne EMAX system “pegs” at 500°F. A reasonable guess is that the CHT peaked somewhere between 550°F and 600°F. No cylinder or piston can tolerate such conditions for very long, and this one obviously didn’t.
Aftermath
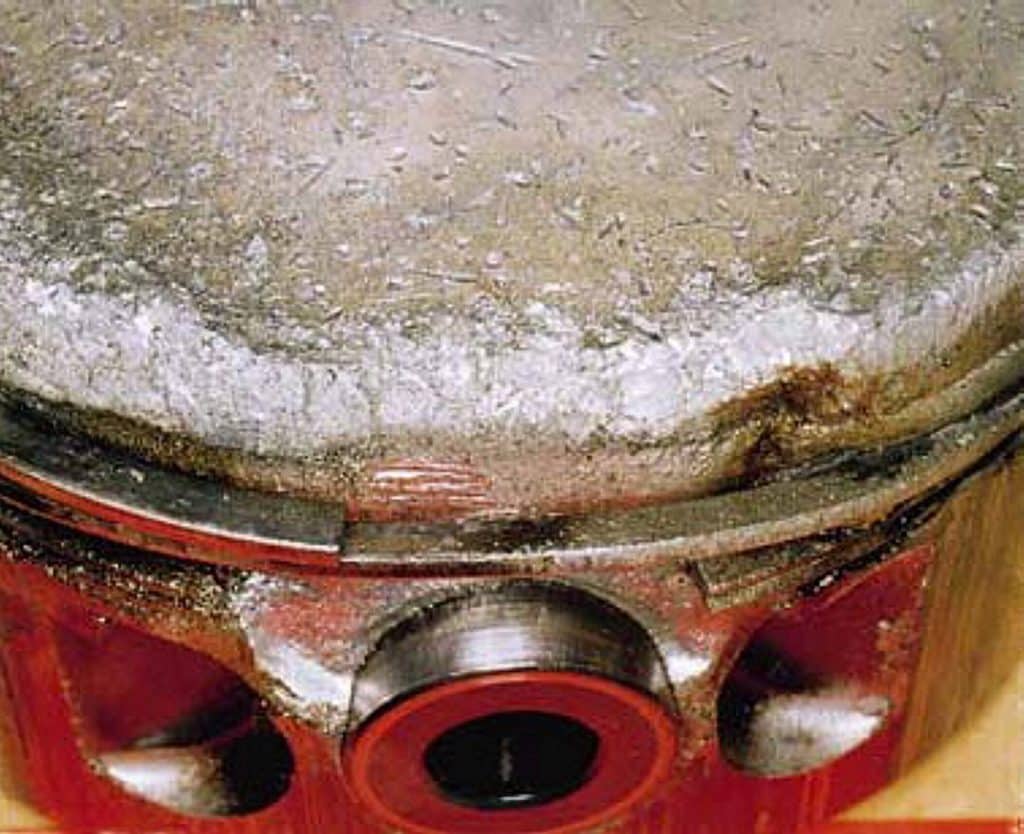
Not long after CHT #1 went off-scale on the MFD, the pilot realized something was very wrong, and pulled the power way back. But he was a couple of minutes late, and the engine was already toast. Here’s what the #1 piston looked like after the event:

Note the melted corners of the piston crown, the destruction of the top compression ring lands, and the severe metal erosion above the piston pin. (Much of this molten metal wound up inside the crankcase and contaminated the bearings and oil passages.) Also note the severely hammered and gouged appearance of the piston crown, undoubtedly caused by loose chunks of metal flying around inside the combustion chamber.
The cylinder head was found to have a big chunk of metal missing from it. Both spark plugs were destroyed by the event as well.
This engine was a low-time TCM factory engine, so the owner figured that the severe engine damage would be covered under TCM’s warranty. I advised him not to bother filing a warranty claim, because I’ve never known TCM to give warranty consideration for a destructive detonation or pre-ignition event. TCM considers this to be operational abuse, not a defect in materials or workmanship, and therefore not covered by warranty. (For what it’s worth, I agree with TCM’s position on this.)
The owner didn’t believe me and filed a warranty claim anyway. TCM promptly and unequivocally denied the claim, just as I told him they would.
Another One
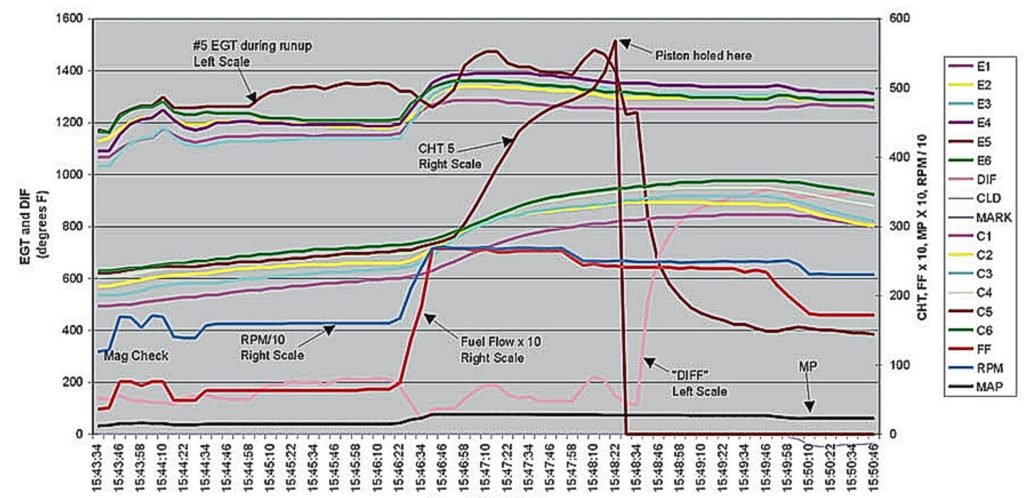
Here’s another similar case that occurred to another TCM-powered airplane very shortly after takeoff. The annotated JPI data for this event is courtesy of General Aviation Modifications Inc. (GAMI):

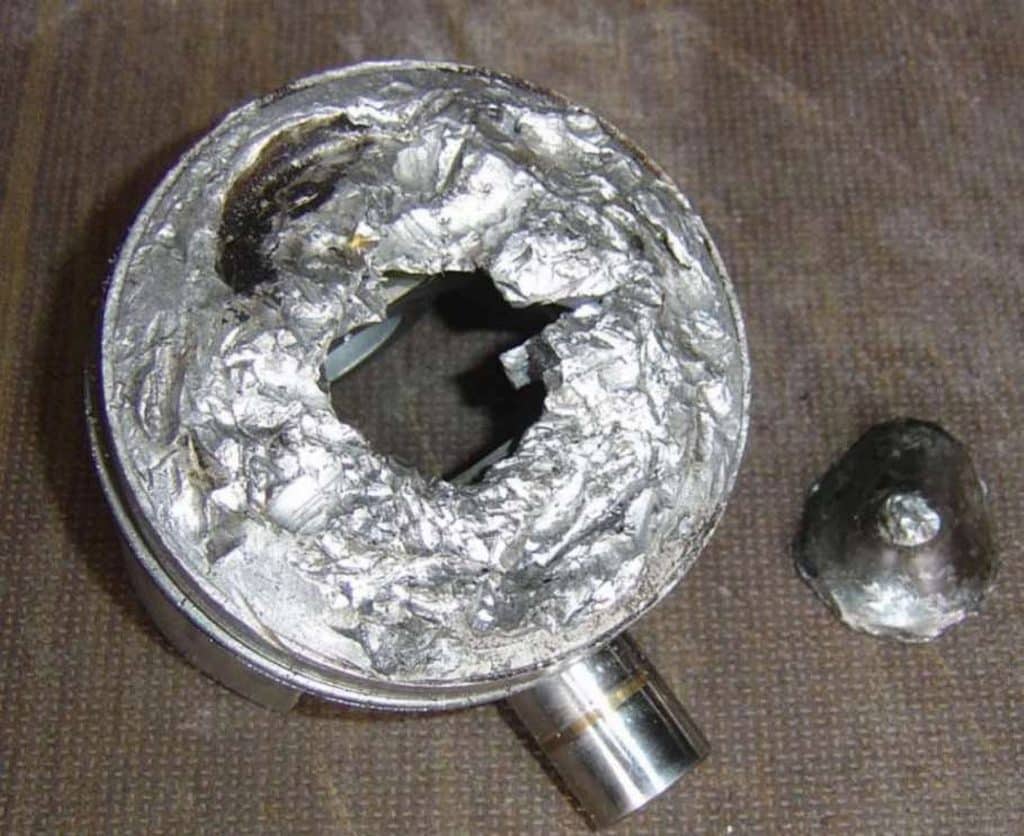
This time, it was the #5 cylinder that experienced thermal runaway and pre-ignition. It was an even more severe event than the one suffered by the Cirrus, and took only two minutes from the application of takeoff power to the complete destruction of the #5 piston, which wound up with a large hole melted through the piston crown:

Now that’s ugly!
In yet another case (for which I unfortunately have no photos), a drop-dead gorgeous Lancair IV-P kitplane powered by a fire-breathing 350-hp TCM TSIO-550 engine went up for its first test flight after 10 years of laborious building time by the owner. Within minutes, the airplane was back on the ground with an engine that was totally destroyed. A forensic post-flight evaluation revealed that the magnetos had been timed approximately 10 degrees advanced from the proper timing. That turned out to be a $50,000 mistake.
The Lancair’s instrument panel was wall-to-wall glass, including an ultra-sophisticated digital engine monitoring system. The engine monitor was literally crying out for attention throughout the short test flight, but the test pilot never noticed its warnings until the engine cratered.
What causes this?
There are a number of things that can cause or contribute destructive events like these. I’ve already mentioned one: advanced ignition timing. I’m astonished at how often we see engines with the magneto timing advanced several degrees from spec. (E.g., 25° BTDC when the engine data plate calls for 22° BTDC.) Even a couple of degrees is enough to significantly reduce the detonation margin of the engine. Add a hot day and perhaps a cooling baffle that isn’t quite up to snuff, and BOOM!
Owners should be particularly alert for mis-timed magnetos whenever maintenance is done that involves magneto removal or adjusting magneto timing. (More often than not, these occur during the annual inspection.) If mag timing is advanced, you’ll notice that your EGTs are lower and your CHTs are higher than what you were seeing prior to maintenance. (Retarded timing results in the opposite: higher EGTs and lower CHTs.) If you notice this after the airplane comes out of maintenance, take it back to the shop and have the mag timing re-checked. It’s a quick check and could save your engine (not to mention your gluteus maximus). Magnetos are required to be timed within one degree of the timing specified on the engine’s data plate, and any error should be in the retarded direction.
Another common culprit is inadequate fuel flow on takeoff. When taking off from a near-sea-level airport—or from any elevation if you’re flying a turbocharged airplane—you need to see fuel flow that’s right up against the red-line on the gauge (or the maximum fuel flow shown in the POH). Unlike most other gauges on your panel, hitting red-line on the fuel-flow gauge (or even going a smidgen over) is a good thing. Takeoff fuel flow is a lot like tire pressure—a bit too much is a whole lot better than a bit too little. Anything less that red-line fuel flow on takeoff reduces the engine’s detonation margin, and significantly less can reduce it enough to cause a catastrophic event.
Not long ago, a client of my maintenance-management firm had a prop-strike incident that required a teardown inspection of the engine. When the inspection was complete and the engine was reinstalled in the airplane, the owner picked up the airplane from the engine shop and flew it back to his home base airport. Upon arriving there, he informed us that the fuel flow was 3 GPH below red-line on takeoff, and asked that we schedule a service appointment to have the fuel flow adjusted.
I was flabbergasted. What was this owner thinking? Why didn’t he abort the takeoff immediately when he noticed that the fuel flow was 3 GPH short, and ask the engine shop to adjust it? Why would he fly the airplane home in that condition? What part of “detonation” didn’t he understand?
Yet another cause is a partially clogged fuel injector nozzle. This can occur anytime, but most frequently occurs shortly after the aircraft comes out of maintenance because that’s the most likely time for foreign material to get into the fuel system. (I’ve had two serious clogged-nozzle episodes in my airplane over the past 22 years, and both occurred shortly after an annual inspection.)
Save your engine!
Regardless of the cause, the solution is not rocket science. There are two simple rules that will almost always prevent these sorts of destructive events from occurring:
First, check your fuel flow gauge early on every takeoff roll. If the fuel flow is not at red-line or very close to it, abort the takeoff and sort things out on the ground. (The exception is takeoffs at high density altitudes in normally-aspirated airplanes, and detonation is quite unlikely under those conditions.)
Second, set your engine monitor CHT alarm to 400°F or less. (I have mine set to 390°F.) When the alarm goes off, do whatever it takes RIGHT NOW to bring the CHT back down below 400°F. Verify that the mixture is full-rich. Turn on the boost pump if it isn’t already on. Open the cowl flaps if you have them. And if CHT climbs above 420°F, throttle back aggressively. Don’t be shy about doing these things immediately, because you may only have a minute or two to act before your engine craters.
(Oh, and if your airplane isn’t equipped with a digital engine monitor with CHT alarm capability, do yourself a favor and install one. Trust me, it’ll pay for itself quickly.)
When you get on the ground, put the airplane in the shop and have the spark plugs removed and inspected for damage, the cylinders borescoped, and the magneto timing checked. If takeoff fuel flow was short of red-line, have it adjusted before further flight.
You bought a plane to fly it, not stress over maintenance.
At Savvy Aviation, we believe you shouldn’t have to navigate the complexities of aircraft maintenance alone. And you definitely shouldn’t be surprised when your shop’s invoice arrives.
Savvy Aviation isn’t a maintenance shop – we empower you with the knowledge and expert consultation you need to be in control of your own maintenance events – so your shop takes directives (not gives them). Whatever your maintenance needs, Savvy has a perfect plan for you: